CARLA Simulator - Python API (Intermediate)
Introduction to 6 Types of Cameras, Lidar, Traffic Manager, and Scenario Runner for Autonomous Driving Challenge.
Introduction
In the previous post, I introduced how to connect to CARLA Simulator using Python API, the difference between synchronous and asynchronous mode, and how to get images from an RGB camera. In this post, I will introduce other types of cameras and sensors.
The source code used in this tutorial is available on GitHub:
1git clone https://github.com/wuhanstudio/carla-tutorial
Example 04: More Cameras
This example introduces how to capture sensor data from multiple cameras. You can get all supported camera types from the blueprint library.
1# Print all camera types
2for bp in bp_lib.filter("camera"):
3    print(bp.id)
At the time of writing, CARLA supports six types of cameras: RGB, Semantic Segmentation, Instance Segmentation, Depth, DVS, and Optical Flow camera.

1python 04_more_cameras.py
We follow the same procedure to spawn six cameras from blueprints, and then attach all cameras to the vehicle.
 1# Create a camera floating behind the vehicle
 2camera_init_trans = carla.Transform(carla.Location(x=-5, z=3), carla.Rotation(pitch=-20))
 3
 4# Create a RGB camera
 5rgb_camera_bp = world.get_blueprint_library().find('sensor.camera.rgb')
 6rgb_camera = world.spawn_actor(rgb_camera_bp, camera_init_trans, attach_to=vehicle)
 7
 8# Create a semantic segmentation camera
 9seg_camera_bp = world.get_blueprint_library().find('sensor.camera.semantic_segmentation')
10seg_camera = world.spawn_actor(seg_camera_bp, camera_init_trans, attach_to=vehicle)
11
12# Create a instance segmentation camera
13ins_camera_bp = world.get_blueprint_library().find('sensor.camera.instance_segmentation')
14ins_camera = world.spawn_actor(ins_camera_bp, camera_init_trans, attach_to=vehicle)
15
16# Create a depth camera
17depth_camera_bp = world.get_blueprint_library().find('sensor.camera.depth')
18depth_camera = world.spawn_actor(depth_camera_bp, camera_init_trans, attach_to=vehicle)
19
20# Create a DVS camera
21dvs_camera_bp = world.get_blueprint_library().find('sensor.camera.dvs')
22dvs_camera = world.spawn_actor(dvs_camera_bp, camera_init_trans, attach_to=vehicle)
23
24# Create an optical flow camera
25opt_camera_bp = world.get_blueprint_library().find('sensor.camera.optical_flow')
26opt_camera = world.spawn_actor(opt_camera_bp, camera_init_trans, attach_to=vehicle)
Similarly, we use the Queue data structure to store sensor data. The only difference is how we handle different types of sensor data. As this tutorial focuses on getting familiar with APIs, it is recommended to refer to the official documentation for comprehensive details on sensor data.
 1# Define camera callbacks
 2def rgb_camera_callback(image, rgb_image_queue):
 3    rgb_image_queue.put(np.reshape(np.copy(image.raw_data), (image.height, image.width, 4)))
 4
 5def seg_camera_callback(image, seg_image_queue):
 6    image.convert(carla.ColorConverter.CityScapesPalette)
 7    seg_image_queue.put(np.reshape(np.copy(image.raw_data), (image.height, image.width, 4)))
 8
 9def ins_camera_callback(image, ins_image_queue):
10    ins_image_queue.put(np.reshape(np.copy(image.raw_data), (image.height, image.width, 4)))
11
12def depth_camera_callback(image, depth_image_queue):
13    image.convert(carla.ColorConverter.LogarithmicDepth)
14    depth_image_queue.put(np.reshape(np.copy(image.raw_data), (image.height, image.width, 4)))
15
16def dvs_camera_callback(data, dvs_image_queue):
17    dvs_events = np.frombuffer(data.raw_data, dtype=np.dtype([
18        ('x', np.uint16), ('y', np.uint16), ('t', np.int64), ('pol', np.bool_)
19    ]))
20
21    dvs_img = np.zeros((data.height, data.width, 4), dtype=np.uint8)
22
23    # Blue is positive, red is negative
24    dvs_img[dvs_events[:]['y'], dvs_events[:]['x'], dvs_events[:]['pol'] * 2] = 255
25
26    dvs_image_queue.put(dvs_img)
27
28def opt_camera_callback(data, opt_image_queue):
29    image = data.get_color_coded_flow()
30    height, width = image.height, image.width
31    image = np.frombuffer(image.raw_data, dtype=np.dtype("uint8"))
32    image = np.reshape(image, (height, width, 4))
33
34    opt_image_queue.put(image)
Congratulations! By now, you have learned how to spawn vehicles and attach sensors to vehicles. You have also learned how to receive and display sensor data from CARLA simulator. The remaining examples explore various intriguing topics that are independent of each other. Feel free to jump directly to the section that interests you the most.
Example 05: Open3D Lidar
This example is available in the official CARLA Video Tutorials.

1python 05_open3d_lidar.py
Example 06: Traffic Manager
This example is available in the official CARLA Tutorials.
In example 01, we learned how to set a vehicle to autopilot mode. You may wonder if we can control the behavior of an autopiloting vehicle. The answer is YES: The Traffic Manager (TM) controls vehicles in autopilot mode. For example, the traffic manager can change the probability of running a red light or set a pre-defined path.
1# Autopilot
2vehicle.set_autopilot(True)

1python 06_trafic_manager.py
After connecting to the CARLA server that listens on port 2000, we can use client.get_trafficmanager() to get a traffic manager.
1# Connect to the client and retrieve the world object
2client = carla.Client('localhost', 2000)
3world = client.get_world()
4
5# Set up the TM (default port: 8000)
6traffic_manager = client.get_trafficmanager()
It is worth noting that the traffic manager runs on the client side, which means it will listen on port 8000 on your local computer rather than on the server that runs the CARLA simulator.
As mentioned before, the traffic manager only manages vehicles in autopilot mode. Thus, we need to ensure the vehicle is in autopilot mode before the traffic manager takes over. Next, we can set the probability of running a red light using the API traffic_manager.ignore_lights_percentage().
1vehicle.set_autopilot(True)
2
3# Randomly set the probability that a vehicle will ignore traffic lights
4traffic_manager.ignore_lights_percentage(vehicle, random.randint(0,50))
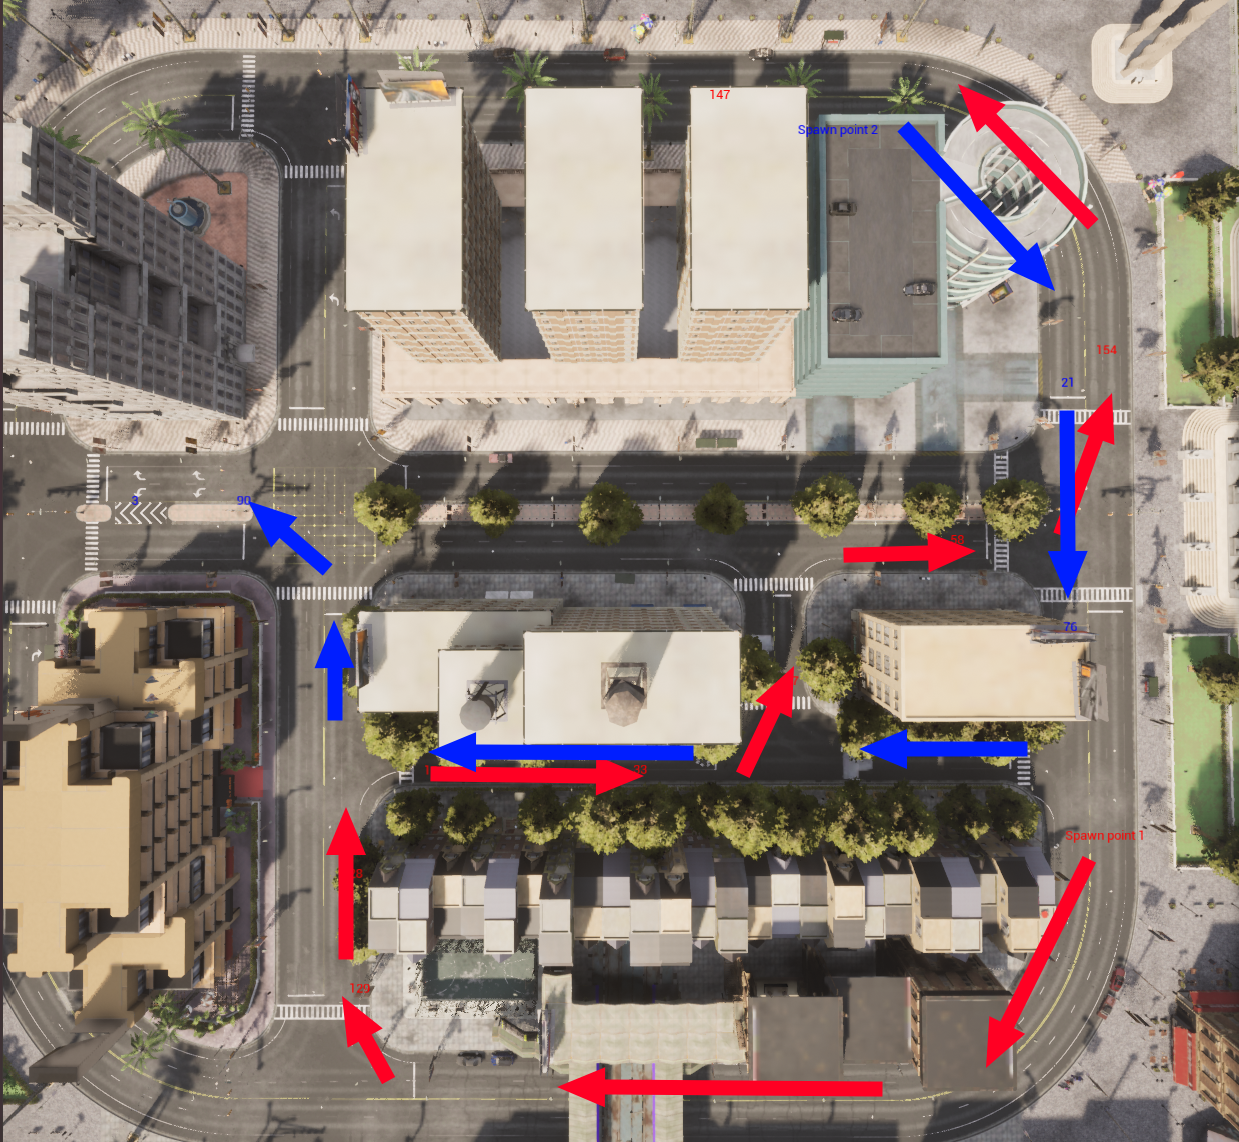
By default, there is no goal for vehicles in autopilot mode, which means their path is endless. They randomly choose a direction at junctions. Using traffic manager, we can specify a path from a point list.
1spawn_points = world.get_map().get_spawn_points()
2
3# Create route 1 from the chosen spawn points
4route_1_indices = [129, 28, 124, 33, 97, 119, 58, 154, 147]
5route_1 = []
6for ind in route_1_indices:
7    route_1.append(spawn_points[ind].location)
8
9traffic_manager.set_path(vehicle, route_1)
We can also use the traffic manager to save computational resources. By default, physics calculations are enabled for all vehicles, which can be computationally expensive. If we enable the Hybrid physics mode, not all autopilot vehicles will do physics calculations.
1# Enable hybrid physics mode to save computational resources.
2TrafficManager.set_hybrid_physics_mode(True)
In hybrid physics mode, whether or not physics calculations are enabled depends on the distance between the autopilot vehicle and the hero vehicle, a vehicle tagged with role_name='hero'. Autopilot vehicles outside a certain radius of the hero vehicle will disable physics calculation, which means they can teleport (very interesting). Of course, the hero vehicle (usually the ego agent) won’t see them teleporting, so during autonomous driving simulation, we won’t see vehicles disappear and reappear through the camera attached to the hero vehicle, making the simulation more realistic while saving some computational resources.
You can find more details about traffic manager in the official documentation.
References
- Carla Official Documentation: https://carla.readthedocs.io/en/0.9.14/tutorials/